Easy as PI Weather Station – putting it all together

Sorry it has taken me so long to continue with this series. There were little things that got in the way such as C*****19, and going through redundancy but lets put those little things aside and recap. Last time we created a web service using node Express which will be used to capture environmental data from our Raspberry PI Sense Hat.

In this article we are going to hook things up by sending the data collected from the Raspberry PI, to our web service. We will also be updating our endpoints to handle the data correctly. Let’s get started!

First of all open the collector.py file.

We are going to POST the data to our web service endpoint. Find the line where we are checking if we have reached the interval and replace it with the code shown here.

if minute_count == MEASUREMENT_INTERVAL:                                                                                 
    # Create the payload object                                                                                          
    payload = {                                                                                                              
    'date':dt.strftime("%Y/%m/%d %H:%M:%S"),                                                                             
    'temperature':round(temp_c,2),                                                                                       
    'pressure':round(sense.get_pressure(),2),                                                                            
    'humidity':round(sense.get_humidity(),2),                                                                        
    }                                                                                                                     
    data = urllib.urlencode(payload)                                                                                     
    request = urllib2.Request(END_POINT,data)                                                                            
    response = urllib2.urlopen(request).read()                                                                           
    print(payload)                                                                                           
    minute_count = 0;   

We are using a couple of Python libraries called urllib and urllib2 to do the heavy lifting of encoding our payload and sending it across to our Node.js server.

All that is left is to add the new endpoint to our Node.js server to process the request and update the list to return an actual list of weather data. Exciting eh! Open up another terminal session and navigate to the server directory. Using your editor of choice open up the index.js file.

Update the endpoints as shown below.

// Provide service meta data
app.get('/api/environment/meta', (req,res) => {
    res.header("Access-Control-Allow-Origin", "*");
    res.send({
        averageTemp:averageTemp,
        count:data.length,
        lastEntry:lastEntry
    } );
} );

// List all entries
app.get('/api/environment/entries', (req,res) => {
    res.header("Access-Control-Allow-Origin", "*");
    res.send(data);
} );

app.post('/api/environment', (req,res) => {
    if (!isValid(req.body)) {
        res.status(400).send('Invalid request, required fields missing.');
        return;
    }
    const count = data.length + 1;
    const entry = {
        id:count,
        date:req.body.date,
        temperature:req.body.temperature,
        pressure:req.body.pressure,
        humidity:req.body.humidity
    }
    lastEntry = entry;
    total += parseFloat(req.body.temperature);
    averageTemp = total / count;
    data.push(entry);
    res.json(entry);
} );

You may recall last time we added a dummy /api/environment/entries endpoint which simply returned an empty array.

Let’s flesh this out. The endpoint is defined as a POST method which means data is sent as part of the body of the request. We validate that we do indeed have a body then update the count metric. We then build a JSON object by pulling out the parts of the request we are interested in. Finally we update the lastEntry variable, work out the average temperature to date before updating our list.

With these changes in place we can run our collector and Node.js server to see the end to end implementation working in all its glory. I would recommend opening two separate terminals and laying them out side-by-side.

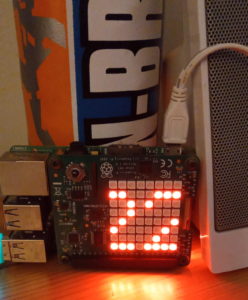
In the terminal for the Python collector start the data harvest using the command python collector.py. On your PI you should see regular temperature updates on the matrix display.

Raspberry PI Weather Station
Weather station running in the Raspberry PI

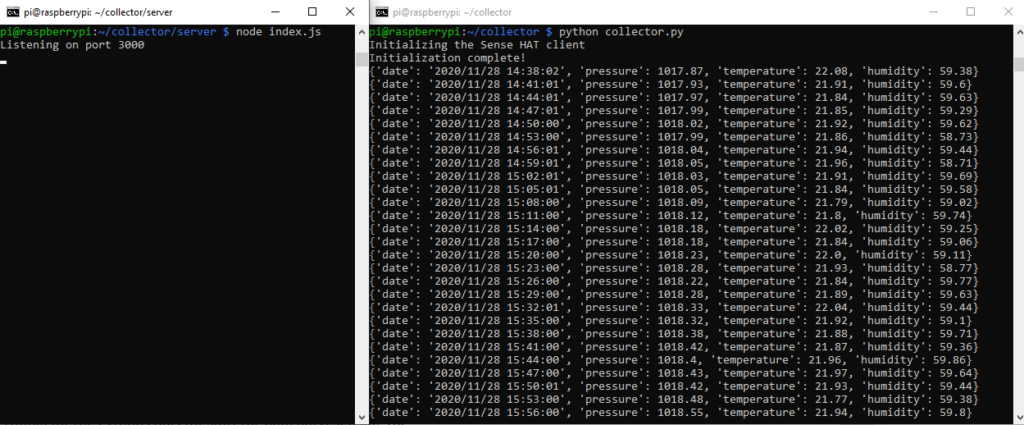
In the second terminal ensure you are in the collector/server directory and start the Node.js server using the command node index.js. If all is well you will see the message Listening on port 3000.

Terminal sessions running the collector and  Node.js server
Terminals sessions showing the collector and Node.js server running on the PI

After a while you will see entries printed in the server console indicating that the weather data has collected from the PI and sent it to our server.

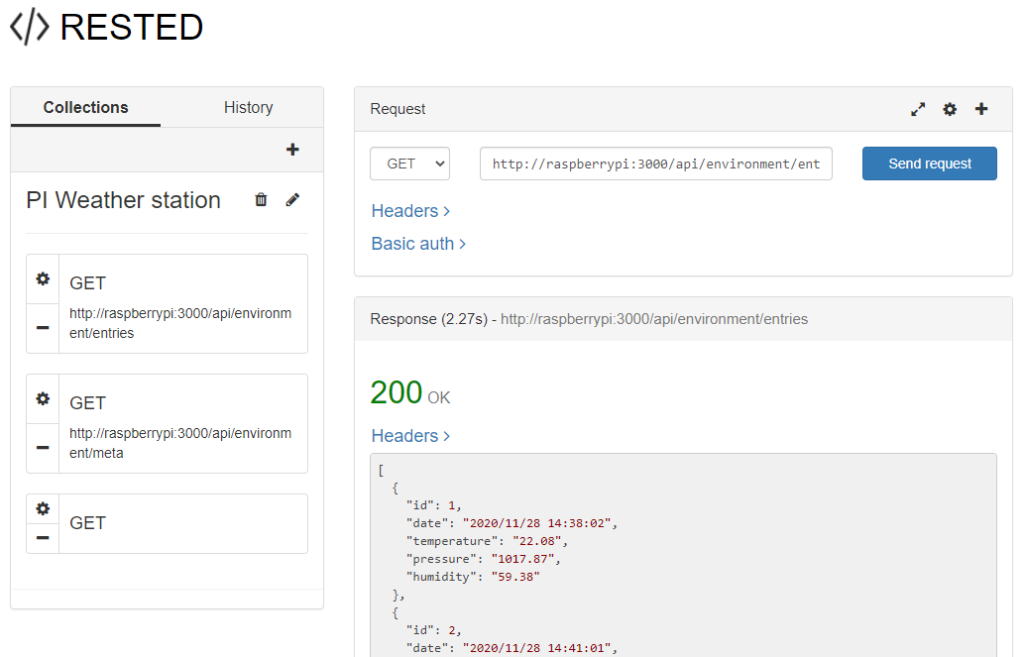
Now comes the exciting bit. We can try out our new endpoints. Open a new browser tab and check the new endpoints are functioning correctly.

http://raspberrypi:3000/api/environment/entries

http://raspberrypi:3000/api/environment/meta

The new endpoints shown using the RESTED Chrome extension

All good? Great! What would be good is if we could somehow visualize our data in an attractive way. Well that’s the subject for the next and final instalment where we will be diving into the wonderful world of D3.

Easy as PI Weather Station – create a Node.js web service in 5 minutes

Introduction

In the last article we created a Python script to collect environmental data from a Sense Hat equipped Raspberry PI.

This article will add to that by creating a web service that will display all logged entries. In the next blog post we will add the ability to upload data from PI to the web service.

This web service will be running on the Raspberry PI but of course it could run anywhere as long as it supplies an endpoint to enable consumers to use it.

Building a RESTful API – do’s and do not’s

The web service will use RESTful principles. REST is a set of best practises to use when designing an API. In a nutshell:

  • DO return JSON
  • DO set the Content-Type header correctly i.e. application/json. Note, when using the PATCH method the content type must be application/merge-patch+json
  • DON’T use verbs e.g. use /songs instead of listSongs/
  • DO use plurals e.g. /api/songs/2019
  • DO return error details in the response body
  • DO make use of status codes when returning errors
    • 400-bad request, 403-forbidden, 404-not found, 401-unauthorised, 500 server error
  • For CRUD operation return the following codes
MethodDescriptionURLResponse code
GETretrieve dataapi/customers200
POSTcreate dataapi/customers
{“name”:”jon”, “email”:”a@a.com”}
201
PUTupdate dataapi/customers/1
{“name”:”dave”,”email”:”b@a.com”}
200
DELETEdelete dataapi/customers/1204
PATCHupdate partial dataapi/customers/1
{“op”:”replace”,”path”:”/email”,”value”:”a@a.com”}]
204
REST method, actions and expected response codes.

Defining the endpoints

Our API will have three endpoints. This article is focussed on the first one, to list entries. The other two will be addressed in a later post.

/api/environment/entries – to list all entries

The resulting JSON will be something like this:

[
    {
        "id":1,
        "date":"2020/06/06 15:34:01",
        "temperature":"24.48",
        "pressure":"998.32",
        "humidity":"44.9"
    }
]

/api/environment/ – to create a new entry

/api/environment/meta – to retrieve metadata such as number of entries, average temperature and last entry that was uploaded

Creating the web service using Express

Let’s get started! Connect your PI to the network either wirelessly or using a cable. I use an Ethernet cable directly plugged it into my laptop.

  1. Power up your PI!
  2. SSH into your PI. I used PuTTY
  3. Navigate to the collector directory we created the last blog post.
  4. mkdir server
  5. cd server

We are going to use Node.js to create our server. Node.js is based on the Chrome V8 Javascript engine but has added modules to deal with IO, HTTP and many more. It is basically a Javascript engine wrapped in a C++ exe. It has a single-threaded handler which hands off requests in an asynchronous manner so it is very suitable to quick high-throughput requests.

Out of the box it is very easy to create a simple REST API. We will be using another node module called express which makes managing routing much easier.

So first things first if you haven’t already done so install node and npm on your PI. Here is a noice instructable showing how to do it.
https://www.instructables.com/id/Install-Nodejs-and-Npm-on-Raspberry-Pi/

When you have successfully installed node and npm return to the server directory we created earlier. Now we can install express which is a lightweight framework for creating REST APIs.
npm install express --save

Create a file called index.js using your editor of choice. I used nano.
nano index.js

Paste the following:

 // import the express module and create the express app
const express = require('express');
const app = express();

// install middleware that can encode the payload
app.use(express.urlencoded({extended:false})); 

// create an array to hold the environmental data
const data = []; 

// End points for the web service
//list entries
app.get('/api/environment/entries', (req,res) => {
    res.send(data); //Just send at empty array for now
} );

// create a web server, running on your port of choice or 3000
const port = process.env.PORT || 3000;
app.listen(port,() => {
    console.log(Listening on port ${port});
} );

This server will respond to HTTP GET requests at the /api/environment/entries endpoint listening on port 3000.

Start the node server
node index.js

Open your browser and go to
http://raspberrypi:3000/api/environment/entries

The result will not be very exciting as you will just see an empty array returned in the browser. However, give yourself a pat on the back. You have created your first fledgling web service!

The four levels of a logon dialog

Today’s article is a bit of fun. We are looking at the four levels of styling a simple logon dialog. These UI components are pretty ubiquitous. Here are a few examples of HTML logon dialogs

Level 1 – basic styling

They all share the same elements, at the minimum two input boxes, an OK button and usually a cancel button. Sometimes there are labels next to each input box. Other times placeholder text is shown in the input controls which gets replaced with whatever you type into the input control. In addition there is often a link to reset the password should it be forgotten.

With this in mind our logon dialog will have two input controls with placeholder text, a single button and a link to reset a forgotten password. Let’s get to work. Our level 1 logon dialog will be vanilla. Some HTML and very little CSS. The CSS is there just to layout the control on the page. Here is our basic HTML.

<html lang="en">
	<head>
		<meta charset="utf-8">
		<title>Login</title>
		<meta name="description" content="Login to your account">
		<meta name="author" content="Jonathan">
		<link rel="stylesheet" href="css/styles.css?v=1.0">
	</head>
	<body>
		<div class="container">
			<div class="log-form">
				<h2>Login to your account</h2>
				<form>
					<input type="text" title="username" placeholder="username" />
					<input type="password" title="password" placeholder="password" />
					<button type="submit" class="btn">Login</button>
					<a class="forgot" href="#">Forgot Username?</a>
				</form>
			</div>
		</div>
	</body>
</html>

Nothing out of the ordinary here. We have defined a container div to allow it to be centred on the page. Inside this div we have another div which holds a standard form element. The form element has two input tags, a button and an anchor. All nice and simple. Let’s now take a look at the CSS

.container {
  display: flex;
  align-items: center;
  justify-content: center;
  height: 100%;
  width: 100%;
}

form {
  width: 100%;
}

input {
  display: block;
  width: 100%;
  margin-bottom: 2em;
  padding: .5em 0;
}

.btn {
  padding: .5em 2em;
}

The container div is styled to fit the whole browser and uses the flex layout to easily centre the logon dialog vertically and horizontally. Note the height and width need to be 100% for this to work. The rest of the CSS is concerned with adding padding and margins to space out the elements in the dialog. This is the result.

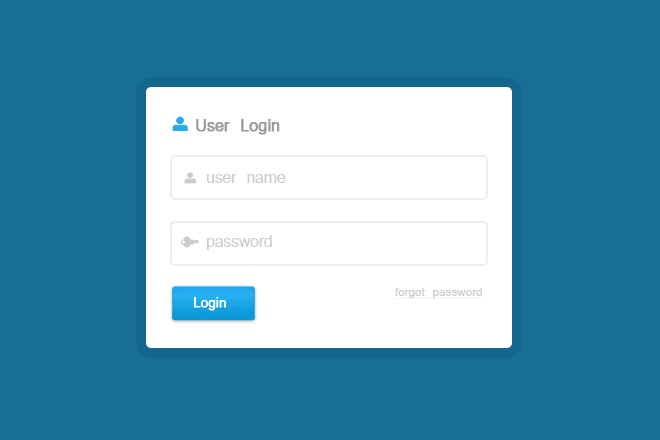
Level 1 logon dialog with minimal styling

Yes it is functional but does it look good? Not really. I’d score it a C and that’s pushing it. The next thing to do is ‘style it up’. Add colours and make it pop. The first thing to do is choose a colour scheme. It’s Summer here in the UK at the moment and the sun is out so I’m thinking orange…let’s get going onto level 2.

Level 2 – style it up

* {
  box-sizing: border-box;
}

body {
  background-color: #ff9800ad;
}

.container {
  align-items: center;
  display: flex;
  justify-content: center;
  height: 100%;
  width: 100%;
}

.log-form {
  position: relative;
  width: 40%;
  background: #fff;
  box-shadow: 0px 2px 5px rgba(0, 0, 0, .25);
}

form {
  width: 100%;
  padding: 2em;
}

h2 {
  color: rgb(255, 87, 34);
  font-size: 1.35em;
  display: block;
  width: 100%;
  text-transform: uppercase;
  padding: 1em;
  margin: 0;
  font-weight: 200;
}

input {
  display: block;
  width: 100%;
  margin-bottom: 2em;
  padding: .5em 0;
  border: none;
  border-bottom: 1px solid #eaeaea;
  padding-bottom: 1.25em;
  color: #757575;
}

.btn {
  display: inline-block;
  background: rgb(255, 87, 34);
  border: none;
  padding: .5em 2em;
  color: white;
  margin-right: .5em;
  box-shadow: inset 0px 1px 0px whitesmoke;
}

.forgot {
  display: flex;
  justify-content: flex-end;
  color: rgb(255, 87, 34);
  font-size: .75em;
  width: 100%;
  transition: color 0.2s ease-in 0s;
}
Level 2 logon dialog, hello sunshine

This is much better. We have a bright background with the dialog centred as before. The dialog has been lifted by introducing a shadow effect around it. The clunky inputs have been styled with a single clean line and the text has been given a deep orange colour to complement the background. The vanilla old skool button has been replaced with a solid orange rectangle with white text. This is all good but look what happens when we navigate around the dialog.

The default blue focus outlines do not look right with the new dialog theme. Luckily we can do something about that.

Level 3 – add some finesse

While the level 2 version of our dialog looked good, but in use the default browser behaviour let it down. So for the next level we are going to provide custom styling to handle the form interactivity. At the same time we are going to add some pleasing animation to really finesse our dialog.

The CSS focus, active and hover pseudo selectors have been added along with animated transitions when moving between state. To highlight the button when it has focus I have added a box-shadow to act as a ‘focus ring’ around the button. The link now adds an underline style when it has focus. Here is the complete CSS.

* {
  box-sizing: border-box;
}

body {
  background-color: #ff9800ad;
}

.container {
  align-items: center;
  display: flex;
  justify-content: center;
  height: 100%;
  width: 100%;
}

.log-form {
  position: relative;
  width: 40%;
  background: #fff;
  box-shadow: 0px 2px 5px rgba(0, 0, 0, .25);
}

form {
  width: 100%;
  padding: 2em;
}

h2 {
  color: rgb(255, 87, 34);
  font-size: 1.35em;
  display: block;
  width: 100%;
  text-transform: uppercase;
  padding: 1em;
  margin: 0;
  font-weight: 200;
}

input {
  display: block;
  width: 100%;
  margin-bottom: 2em;
  padding: .5em 0;
  border: none;
  border-bottom: 1px solid #eaeaea;
  padding-bottom: 1.25em;
  color: #757575;
  transition: border-bottom 0.2s ease-in 0s;
}

input:focus,
input:hover {
  outline: none;
  border-bottom: 1px solid darkorange;
}

.btn {
  display: inline-block;
  background: rgb(255, 87, 34);
  border: none;
  padding: .5em 2em;
  color: white;
  margin-right: .5em;
  box-shadow: inset 0px 1px 0px whitesmoke;
  transition-property: background,box-shadow;
  transition-duration: 0.1s;
  transition-timing-function: ease-in;
  box-shadow: none;
}

.btn:hover {
  background: rgba(255, 87, 34, 0.8);
}

.btn:focus {
  outline:none;
  box-shadow: 0px 0px 2px 2px rgba(191,54,12,0.6);
}

.btn:active {
  background: #bf360c;
  box-shadow: inset 0px 1px 1px #bf360c;
}

.forgot {
  display: flex;
  justify-content: flex-end;
  color: rgb(255, 87, 34);
  font-size: .75em;
  text-decoration-line: none;
  width: 100%;
  transition: color 0.2s ease-in 0s;
}

.forgot:focus {
  text-decoration-line: underline;
  outline: none;
}

.forgot:hover {
  color: rgba(255, 87, 34, 0.8);
}

.forgot:active {
  color: #bf360c;
}

Level 4 – animate it

I though it would be cool to have a bouncing effect when the page is loaded. So the dialog jumps up and bounces ‘down’ onto the screen. This is fairly straightforward to do using animation keyframes.

The animation is referenced in the log-form class by supplying the name and duration. This tells the animation what element it is going to animate.

.log-form {
  animation-duration:1s;
  animation-name: bounce;
  width: 40%;
  background: #fff;
  box-shadow: 0px 2px 5px rgba(0, 0, 0, .25);
}

Here the animation is called bounce, the timing function allows you to define how the animation moves. Details here. Next you define the animation using the @keyframes keyword in your CSS file.

@keyframes bounce {
  0%   { transform: scale(1,1)    translateY(0); }
  10%  { transform: scale(1.1,.9) translateY(0); }
  30%  { transform: scale(.9,1.1) translateY(-100px); }
  50%  { transform: scale(1,1)    translateY(0); }
  57%  { transform: scale(1,1)    translateY(-7px); }
  64%  { transform: scale(1,1)    translateY(0); }
  100% { transform: scale(1,1)    translateY(0); }
}

The @keyframes keyword defines to do and when to do it. So in the example above at 10% we are squatting down to jump by making the dialog shorter and fatter. At 30% the dialog jumps by springing up. In doing so it becomes thinner and taller. At halfway we land on the ground before doing a little bounce after landing. This makes more sense seen in slow motion followed by the faster version.

The transform property allows you to rotate, scale, skew or translate(move) an element. In this case we are using a combination of scale and translate.

Here is the full CSS

* {
  box-sizing: border-box;
}

body {
  background-color: #ff9800ad;
}

.container {
  align-items: center;
  display: flex;
  justify-content: center;
  height: 100%;
  width: 100%;
}

.log-form {
  animation-duration:1s;
  animation-name: bounce;
  animation-timing-function: ease;
  width: 40%;
  background: #fff;
  box-shadow: 0px 2px 5px rgba(0, 0, 0, .25);
}

@keyframes bounce {
  0%   { transform: scale(1,1)    translateY(0); }
  10%  { transform: scale(1.1,.9) translateY(0); }
  30%  { transform: scale(.9,1.1) translateY(-100px); }
  50%  { transform: scale(1,1)    translateY(0); }
  57%  { transform: scale(1,1)    translateY(-10px); }
  64%  { transform: scale(1,1)    translateY(0); }
  100%  { transform: scale(1,1)    translateY(0); }
}

form {
  width: 100%;
  padding: 2em;
}

h2 {
  color: rgb(255, 87, 34);
  font-size: 1.35em;
  display: block;
  width: 100%;
  text-transform: uppercase;
  padding: 1em;
  margin: 0;
  font-weight: 200;
}

input {
  display: block;
  width: 100%;
  margin-bottom: 2em;
  padding: .5em 0;
  border: none;
  border-bottom: 1px solid #eaeaea;
  padding-bottom: 1.25em;
  color: #757575;
  color: rgb(255, 87, 34);
  transition: border-bottom 0.2s ease-in 0s;
}

input:focus,
input:hover {
  outline: none;
  border-bottom: 1px solid darkorange;
}

.btn {
  display: inline-block;
  background: rgb(255, 87, 34);
  border: none;
  padding: .5em 2em;
  color: white;
  margin-right: .5em;
  box-shadow: inset 0px 1px 0px whitesmoke;
  transition-property: background,box-shadow;
  transition-duration: 0.1s;
  transition-timing-function: ease-in;
  box-shadow: none;
}

.btn:hover {
  background: rgba(255, 87, 34, 0.8);
}

.btn:focus {
  outline:none;
  -webkit-box-shadow: 0px 0px 2px 2px rgba(191,54,12,0.6);
  -moz-box-shadow: 0px 0px 2px 2px rgba(191,54,12,0.6);
  box-shadow: 0px 0px 2px 2px rgba(191,54,12,0.6);
}

.btn:active {
  background: #bf360c;
  box-shadow: inset 0px 1px 1px #bf360c;
}

.forgot {
  display: flex;
  justify-content: flex-end;
  color: rgb(255, 87, 34);
  font-size: .75em;
  text-decoration-line: none;
  width: 100%;
  transition: color 0.2s ease-in 0s;
}

.forgot:focus {
  text-decoration-line: underline;
  outline: none;
}

.forgot:hover {
  color: rgba(255, 87, 34, 0.8);
}

.forgot:active {
  color: #bf360c;
}

So there we have it. Zero to hero in four steps. Enjoy!

Binary Search Tree – Java implementation

This data structure is an important one to know. A Binary Search Tree allows you to maintain a data set in sorted order. This in turn allows you efficiently locate data items

This data structure is an important one to know. A Binary Search Tree allows you to maintain a data set in sorted order. This in turn allows you efficiently locate data items. If you would were to use a standard array you would need to sort it every time you add a new data item. Not so with the BST. So with this in mind it must be pretty tricky to implement one, yes? It’s actually quite straightforward. Let us dive in.

Each node in the BST holds some data which can be compared. This is important because it is this that enables data to be chunked or grouped based on the notion that one node is greater than the other.

A simple Binary Search Tree

Our data set looks like this 5,2,6,9,1,3,4.

In the example above 5 is the first item to be added. There is nothing in the tree to start with so the root contains 5. Next up in our list is 2. We would examine the first(root) node and ask ourselves this question “Is our new value greater or less than the current node?”. Here 2 is less than 5 so it is placed in the left-hand side of the root node. Next up is 6. Again we would look at the first node(the root) and determine that 6 is greater than 5 and therefore place it in the right-hand side of the root node. Now our root node has two children 2 and 6. Now if we want to add the value 9 we look at the root, 9 is greater than 5 so we will place it on the right-hand side. However we can’t do this because it already has the value 6. Now we look at node containing 6. 9 is greater than 6 so 9 is placed in the right-hand side of the node that contains 6, and so on…

Using this information we can define a Java class to represent a node in a BST.

public class BSTNode {
    public int data;
    public left;
    public right;
    public BSTNode(int value) {
        data = value;
        left = null;
        right = null;
    }
}

The BSTNode class is very simple. It has three public members. One to hold the data, in this case to keep things easy it is just an integer number for easy comparison. The other two hold the left and right child nodes. When the class is constructed the data value is passed in and set. Now to create the tree class itself and a method to add a value to the tree.

public class BinarySearchTree {
	public BSTNode root;

	public BinarySearchTree() {
		root = null;
	}

	/**
	 * Add a new node
	 * @param value The node value
	 * @return The new node
	 */
	public BSTNode add(int value) {
		// Create the new node
		BSTNode newNode = new BSTNode(value);
		// If there is no root then create and return
		if (this.root == null) {
			this.root = newNode;
			return this.root;
		}
		//Recurse through the tree and find the one where the data should be set
		BSTNode node = nextNode(this.root, value);
		if (value < node.data) {
			node.left = newNode;
		}
		else {
			node.right = newNode;
		}
		return newNode;
	}
	
	/**
	 * Get the next node that has does not have children
	 * @param node The current node
	 * @param value The value to be compared against the node's data value
	 * @return The node
	 */
	private BSTNode nextNode(BSTNode node, int value) {
		boolean leftNode = value < node.data;
		if (leftNode && node.left != null) {
			return nextNode(node.left, value);
		} else if (!leftNode && node.right != null) {
			return nextNode(node.right, value);
		}
		return node;
	}
}

In order to effectively traverse the tree I have implemented a recursive function which drills down into each child comparing the value as it goes and when it find the last correct node that does not have left/right child node it returns. The calling function then sets the correct class member left or right depending on the value.

Let’s test our BST. We are going to add a unit test to ensure that the tree has been built correctly.

import static org.junit.Assert.*;  
import org.junit.Test;


public class TestBinarySearchTree {

	@Test
	public void testAdd() {
		// 5,2,6,9,1,3,4
		BinarySearchTree tree = new BinarySearchTree();
		// Add the root 5
		BSTNode root = tree.add(5);
		assertEquals(root, tree.root);
		// Add 2
		BSTNode node2 = tree.add(2);
		assertEquals(root.left, node2);
		// Add 6
		BSTNode node6 = tree.add(6);
		assertEquals(root.right, node6);
		// Add 9
		BSTNode node9 = tree.add(9);
		assertEquals(node6.right, node9);
		// Add 1
		BSTNode node1 = tree.add(1);
		assertEquals(node2.left, node1);
		// Add 3
		BSTNode node3 = tree.add(3);
		assertEquals(node2.right, node3);
		// Add 4
		BSTNode node4 = tree.add(4);
		assertEquals(node3.right, node4);
	}
}

Here we are checking that each node is placed correctly in the tree.

Easy as PI Weather Station – collecting the data

I inherited a Raspberry PI from a work colleague. It was complete with the Astro PI Hat(now known as the Sense Hat). This marvellous add-on gives a variety of environmental sensors such as temperature, humidity and air pressure.

For a while it sat there on the shelf dusty and forelorn. While doing some work in my shed I wondered whether I could use my PI to gather information and display it on the matrix display. I found a marvellous article on how to create a weather station by John M. Wargo. It is well worth a read. In the article, data is collected at regular intervals from the PI sensors and then uploaded to an external site hosted by weather underground. In no time I had a working weather station. I tweaked the script to show a line graph but it was a little janky because of the low resolution of the display.

Here is the PI in all its glory showing realtime temperature readings in graph form

In this post we are going to do something similar. We are going to collect data but upload it on our own server running a REST API. Then we are going to display this information on a lovely D3 chart. Wait! What? Yes, that is a lot to take in but fear not, this is going to be a 3 part post. The first part? Getting the data from the PI.

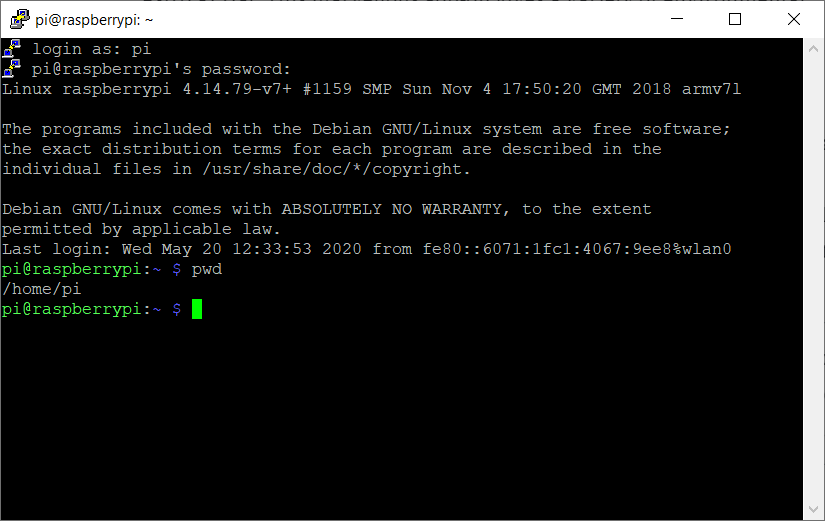
Let’s assume we have a fresh PI complete with an Astro Hat. Log in to your PI using puTTY or another application. I connect my PI direct to my laptop using an Ethernet cable but a wireless connection will work as well.

Now in your home directory(in my case /home/pi) create a new directory called collector

mkdir collector

Next use your editor of choice to create a file in the collector directory called collector.py. I use nano so in this case type nano collector.py.

Below is the code for collector.py. I ‘ll skip the first few functions. get_cpu_temp(), get_smooth() and get_temp(). These are used to try and get an accurate temperature reading because the Astro PI hat is affected by the heat given off y the PI CPU. These functions try and make allowances for that. Details here. If you can physically separate your PI using a ribbon cable then you can simply take the standard reading from the humidity sensor as detailed in the Sense Hat API.

#!/usr/bin/python
'''*******************************************************************************************************************************************
* This program collects environmental information from the sensors in the Astro PI hat and uploads the data to a server at regular intervals *
*******************************************************************************************************************************************'''
from __future__ import print_function
import datetime
import os
import sys
import time
import urllib
import urllib2
from sense_hat import SenseHat
# ============================================================================
# Constants
# ============================================================================
# specifies how often to measure values from the Sense HAT (in minutes)
MEASUREMENT_INTERVAL = 5 # minutes
def get_cpu_temp():
    # 'borrowed' from https://www.raspberrypi.org/forums/viewtopic.php?f=104&t=111457
    # executes a command at the OS to pull in the CPU temperature
    res = os.popen('vcgencmd measure_temp').readline()
    return float(res.replace("temp=", "").replace("'C\n", ""))
# use moving average to smooth readings
def get_smooth(x):
    # do we have the t object?
    if not hasattr(get_smooth, "t"):
        # then create it
        get_smooth.t = [x, x, x]
    # manage the rolling previous values
    get_smooth.t[2] = get_smooth.t[1]
    get_smooth.t[1] = get_smooth.t[0]
    get_smooth.t[0] = x
    # average the three last temperatures
    xs = (get_smooth.t[0] + get_smooth.t[1] + get_smooth.t[2]) / 3
    return xs
def get_temp():
    # ====================================================================
    # Unfortunately, getting an accurate temperature reading from the
    # Sense HAT is improbable, see here:
    # https://www.raspberrypi.org/forums/viewtopic.php?f=104&t=111457
    # so we'll have to do some approximation of the actual temp
    # taking CPU temp into account. The Pi foundation recommended
    # using the following:
    # http://yaab-arduino.blogspot.co.uk/2016/08/accurate-temperature-reading-sensehat.html
    # ====================================================================
    # First, get temp readings from both sensors
    t1 = sense.get_temperature_from_humidity()
    t2 = sense.get_temperature_from_pressure()
    # t becomes the average of the temperatures from both sensors
    t = (t1 + t2) / 2
    # Now, grab the CPU temperature
    t_cpu = get_cpu_temp()
    # Calculate the 'real' temperature compensating for CPU heating
    t_corr = t - ((t_cpu - t) / 1.5)
    # Finally, average out that value across the last three readings
    t_corr = get_smooth(t_corr)
    # convoluted, right?
    # Return the calculated temperature
    return t_corr

The main meat is in the, erm, main() function. Here we set up a loop to poll the PI at regular intervals, every 5 seconds so that the smoothing algorithm works effectively. The data is sent to the web service every 5 minutes. This is specified in the global variable MEASUREMENT_INTERVAL.

def main():
    global last_temp
    sense.clear()
    last_minute = datetime.datetime.now().minute;
    minute_count = 0;
    # infinite loop to continuously check weather values
    while True:
        dt = datetime.datetime.now()
        current_minute = dt.minute;
        temp_c = get_temp();
        # The temp measurement smoothing algorithm's accuracy is based
        # on frequent measurements, so we'll take measurements every 5 seconds
        # but only upload on measurement_interval
        current_second = dt.second
        # are we at the top of the minute or at a 5 second interval?
        if (current_second == 0) or ((current_second % 5) == 0):
            message = "{}C".format(int(temp_c));
            sense.show_message(message, text_colour=[255, 0, 0])
        if current_minute != last_minute:
            minute_count +=1
        if minute_count == MEASUREMENT_INTERVAL:
            print('Logging data from the PI')
            payload = {
                'date':dt.strftime("%Y/%m/%d %H:%M:%S"),
                'temperature':round(temp_c,2),
                'pressure':round(sense.get_pressure(),2),
                'humidity':round(sense.get_humidity(),2),
            }
            print(payload)
            # TODO post the results to our server
            minute_count = 0;
        last_minute = current_minute
        # wait a second then check again
        time.sleep(2)  # this should never happen since the above is an infinite loop
    print("Leaving main()")
# ============================================================================
# initialize the Sense HAT object
# ============================================================================
try:
    print("Initializing the Sense HAT client")
    sense = SenseHat()
    sense.set_rotation(90)
except:
    print("Unable to initialize the Sense HAT library:", sys.exc_info()[0])
    sys.exit(1)
print("Initialization complete!")
# Now see what we're supposed to do next
if __name__ == "__main__":
    try:
        main()
    except KeyboardInterrupt:
        print("\nExiting application\n")
        sense.clear()
        sys.exit(0)

A JSON object is used to hold this data which will look something like this

{
    'date': '2020/05/26 14:01:00',
    'pressure': 1035.2,
    'temperature': 28.36,
    'humidity': 39.82
}

This will be used as the payload to our web service. More to follow in part 2…

Write your own Chrome extension

Have you ever wondered how to create a Chrome extension? What magic happens under the hood? Well look no further. I am going to walk you through a simple Chrome extension which hopefully will give you enough information to get you started writing your own. The code can be found here.

The problem

I have written a node.js server which uses a REST API to give me the top 40 music charts for the UK. This serves up JSON as shown below. I want to know where Stormzy placed in 2019. Scanning down the page it takes me a little while to find that Stormzy was the number 7 top seller for 2019. Impressive.

It was a little difficult to find what I was looking for. What I would really like to do is pretty print the JSON directly in the browser. Let’s start working on our extension.

What is an Extension?

An extension is a small program written in Javascript, HTML and CSS which modifies and enhances the browser functionality.

Google has provided a full, feature-rich API which provides the means to build complex browser extensions. For my extension I didn’t need all the bells and whistles, but simply a way to intercept a browser page and change the HTML. Google has provided a way of doing this using content scripts.

Check out for extensions API here http://developer.chrome.com/extensions. You can see what extensions are installed locally by typing <a href="chrome://extensions/">chrome://extensions/</a> into the browser bar.

Let’s get going

One of the most important files is called the <a rel="noreferrer noopener" href="https://developer.chrome.com/extensions/manifest" target="_blank">manifest.json</a>. This file defines the code that is run when the page is loaded.

{
	"manifest_version": 2,
	"name": "JSON Formatter",
	"version": "1.0",

	"description": "Format JSON",

	"page_action": {
		"default_icon": "icon.png"
	},

	"content_scripts": [{
		"matches": ["<all_urls>"],
		"css": ["content.css"],
		"js": ["content.js"]
	}]
}

The manifest is simple enough for this extension. The manifest_version, name and version string are mandatory.

Next we have two possible options, page_action or browser_action. Both place an icon in the tool bar but operate in different scopes. The first is applicable for actions that take place in the current page only. e.g. subscribing to a page’s RSS feed. The second is applicable for all pages. Be aware that page actions are not always visible depending on their context whereas when using browser_action the icon is always available. For our extension we will use page_action. Inside this property we can also define an icon that is displayed in the toolbar. For designing icons I recommend https://www.canva.com/.

content_scripts defines the code that gets executed for a particular page in the browser. They have access to the DOM and can modify it. The ‘matches’ property is used to restrict the extension to those URLs that we know will return valid JSON. In this case we don’t care and allow all pages access to the extension. When a match is found, the content.js file will be run allowing it to access and change the page content. Before we dive into the main script file we also need to define our styles.

content.css

Styling is done courtesy of a simple stylesheet to highlight JSON key-value pairs and text/numeric content. Note: be sure to scope your CSS styles.

.json-pretty-print {
   color: #111; 
   font-family: 'Helvetica Neue', sans-serif; font-size: 14px; font-weight: 500; 
   background-color: ghostwhite;
   border: 1px solid silver;
   padding: 10px;
   margin: 20px;
   overflow: auto;
   height:90%;
}

.json-pretty-print .json-key {
   color: brown;
   }
.json-pretty-print .json-value-int {
   color: navy;
   }
.json-pretty-print .json-value-str {
   color: olive;
   font-style: italic;
}

content.js

I took the liberty of scouring the internet for a suitable fiddle to perform the pretty printing of the JSON. I’ve slightly modified it to use classes instead of embedded styles. The original fiddle can be found here.

// http://jsfiddle.net/alanwsmith/EwT4E/
function jsonPrettyHighlight(_jsonObj) {
    
    var json = JSON.stringify(_jsonObj, undefined, 2);
    
    json = json.replace(/&/g, '&').replace(/</g, '<').replace(/>/g, '>');
    json = json.replace(/("(\\u[a-zA-Z0-9]{4}|\\[^u]|[^\\"])*"(\s*:)?|\b(true|false|null)\b|-?\d+(?:\.\d*)?(?:[eE][+\-]?\d+)?)/g, function (match) {
        var cls = 'json-value-int';
        if (/^"/.test(match)) {
            if (/:$/.test(match)) {
                cls = 'json-key';
            } else {
                cls = 'json-value-str';
            }
        }
        return '<span class="' + cls + '">' + match + '</span>';
    });
    return json;    
}


try {
    jsonObject = JSON.parse(document.body.innerText);
    if (jsonObject) {

        var prettyPrintedJson = jsonPrettyHighlight(jsonObject);
        var container = document.createElement("pre");
        container.classList.add("json-pretty-print")
        document.body.firstChild.style.display = "none";

        container.innerHTML = prettyPrintedJson;
        document.body.appendChild(container);    
    }
} catch (ex) {
    // do nothing, the current page is not altered
}

The bulk of the work is done in the function jsonPrettyHighlight. The code in the try block grabs whatever is in the current web page and tries to parse it. In our manifest.js we do not limit the page based on the URL so it could contain anything. If the parse fails then the page is untouched.

If we happen to have a pukka JSON object then we pass it to the pretty print function, which returns an HTML string. Note that the original JSON is already returned so we can either delete it from the DOM or as I have done simply hide it. The final step is to wrap the string in <pre> tags to preserve tabs and the such-like before appending it to the document body.

Installing the extension

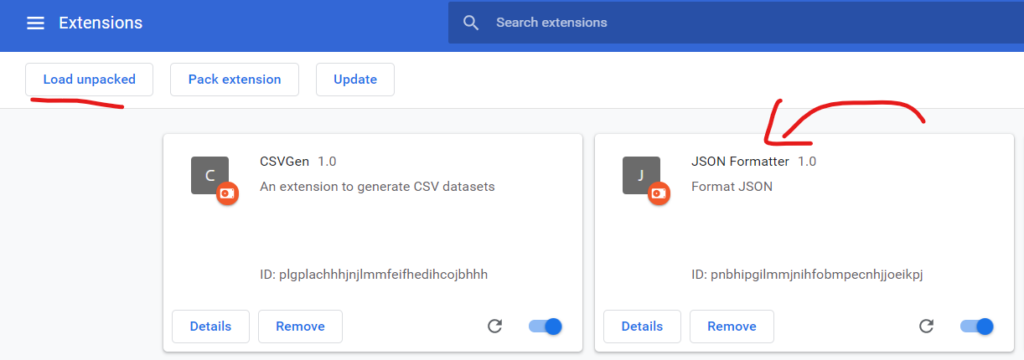
To install the plugin open the extensions tab by clicking the ‘burger’ menu in Chrome, which can be found in the top-right of the window just below the Close icon. Select More tools->Extensions. Another way is to open a new tab and type chrome://extensions/.

Once the extensions tab is open click the ‘Load unpacked’ button and locate the directory where you saved you extension files. If all is well the page will refresh and you will see your extension listed.

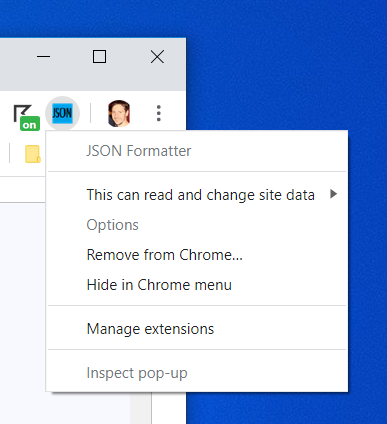
The icon specified in the manifest will be displayed on the toolbar. Right-click the icon to remove the extension or hide it from the toolbar

Running the extension

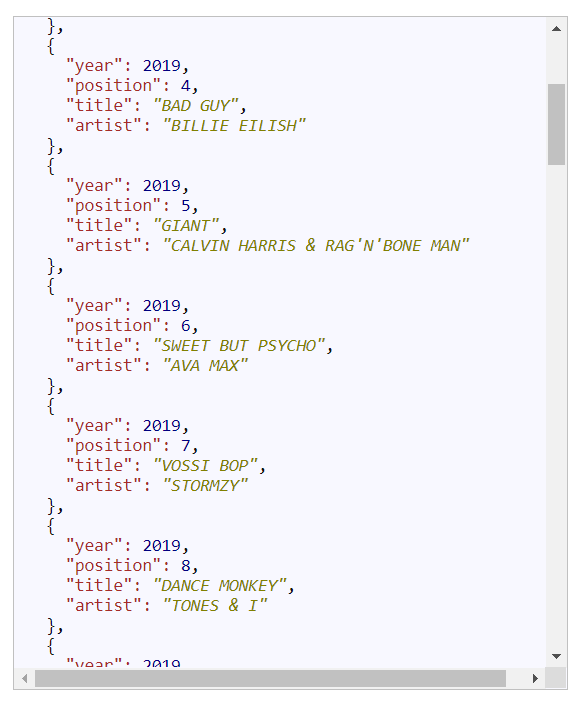
To run the extension simply navigate to a URL that returns JSON and you should see the page nicely formatted. I think you’ll agree this looks much better than before. Now where is that Stormzy listing…

Debugging

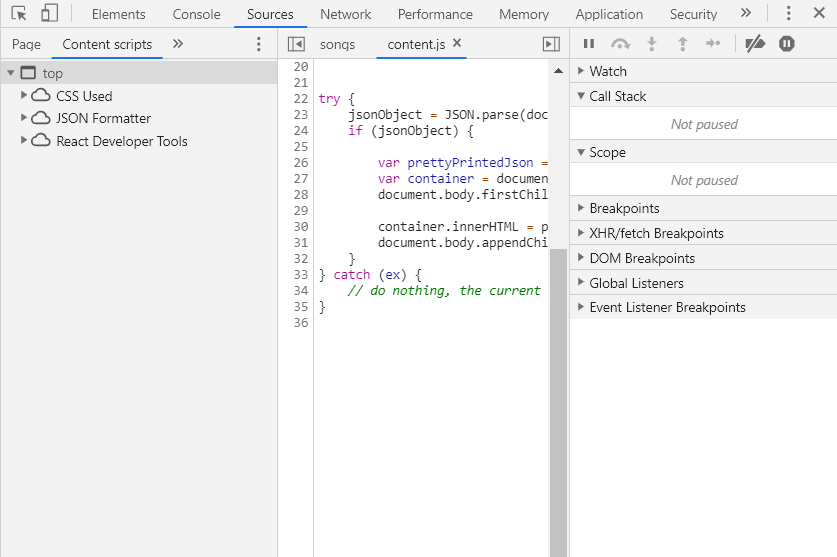
Debugging is exactly the same as normal Javascript debugging in Chrome. Navigate to a tab that is running the extension and press F12. Notice that a new tab is provided for exploring any content scripts that have been injected into the browser page.

Javascript 5 versions and features

I am going to start with version 5 as this was a game changer, bringing JSON, new String and Array functions and various syntactical improvements. Prior to that things were a little, well…meh with different browsers adding their own functions and enhancements. ES5 sought to codify these differences into a single standard version of Javascript. This is a bit of a mammoth post so hold on tight it’s going to be a wild ride…maybe.

ES5 – ECMA-262 5th edition – December 2009

‘use strict’

Some would argue that this should have been turned on by default. Setting this option saves a lot of headaches and catches early bugs that would otherwise have slipped through the net.

Syntactic changes to the language

Using reserved words as property names

I’m not sure why you should use property names that are also reserved words.

var obj = {new:'object',}; //The property name is a reserved word ooh err!

Trailing or dangling commas

This can be used in object, array and function definitions. An advantage of using dangling commas is clean diffs. Only the line changed is shown in the diff tool as opposed to two. Personally I don’t like the look of that extra comma.

var array = ['a',,,,,]; // multiple trailing commas allowed!
console.log(array); //[ 'a', <4 empty items> ]

// Adding more than one comma results in an error
var object = {
  propa:'a',
  func: function() {
    console.log('I have been called');
  },
}

// This works too!
function add(a,b,) {
  console.log(a+b);
}
console.log(object); //{ propa: 'a', func: [Function: func] }

Multi-line strings

A backslash can be used to continue a string on multiple lines.

var str = 'hello \
this string \
is on multiple lines';
console.log(str);//hello this string is on multiple lines

The Google style guide recommends concatenating instead of escaping multi-line strings.

Object.create()

This function allows you to create an object given an object prototype and an optional list of additional properties to be applied to the new object. In the example below there is a Fruit object defined with two properties and a single function which displays the name and colour of the fruit. Next Object.create is called using the Fruit class and implementing the name and colour properties. When info is called the interpreter checks the current(lemon) object for the info function which it cannot find. The next step is check the object prototype and hey presto it finds a definition in the Fruit object so it gets called. So you can see this pattern is a powerful mechanism for providing a way to inherit functionality from other objects.

var Fruit = {
  name: 'Fruit',
  colour: 'Fruity',
  info: function() {
    // Capitalize the first letter of the name
    var name = this.name.charAt(0).toUpperCase() + this.name.slice(1);
    return name+' is the colour '+this.colour+'.'; 
  }
}

var lemon = Object.create(Fruit,{
  name:{value:'lemon'},
  colour:{value: 'yellow'}
});
console.log(lemon.info()); //Lemon is the colour yellow.

Object.getPrototypeOf()

Using the example above if we call:

var fruit = Object.getPrototypeOf(lemon);
console.log(fruit.info());

What do we get back? Remember what Object.create is essentially doing is assigning an object to a prototype property. So in this case the Fruit object would be returned

var fruit = Object.getPrototypeOf(lemon);
console.log(fruit.info()); //Fruit is the colour  of fruit.
console.log(fruit === Fruit);//true

Object.defineProperty()

An interesting thing to note is that the property descriptors have different default values depending on how the property is created. For example if creating an object using object notation all descriptors are set to true. Conversely when creating a property on an object using defineProperty any unassigned descriptors are explicitly set to false.

//Create a car object
//Note: writable,enumerable,configurable true by default
var car = {
  name: 'Escort RS2000',
  make: 'Ford'
}

//Create a new prop on the car object to return the name,make
// capacity and sound
//writable,enumerable,configurable false by default
Object.defineProperty(car, 'show', { 
  value: function() {
    return this.make+' '+this.name+' '+this.capacity+'cc'+' '+this.sound;
  }
});

//Create a 'sound' prop which can be changed and removed
Object.defineProperty(car, 'sound', { 
    value: 'Beep!',
    writable: true,
    enumerable: true,
    configurable: true
  }
);

//Create a engine capacity prop that can be updated but not removed
Object.defineProperty(car, 'capacity', {
  value: 1993,
  writable: true
});

console.log('1.'+car.show()); //Ford Escort RS2000 1993cc Beep!
car.name='Focus Ghia'; //Can be changed
car.capacity = 1600; //Can be changed
car.sound = 'Beep beep!'; //Can be changed
console.log('2.'+car.show()); //Ford Focus Ghia 1600cc Beep beep!
delete car.sound; //Can be removed
delete car.capacity; //Cannot be removed
console.log('3.'+car.show()); //Ford Focus Ghia 1600cc undefined
//Let's try changing the show function
car.show = function() { return 'HONK!' };//Cannot be changed
console.log('4.'+car.show()); //Ford Focus Ghia 1600cc undefined

Object.defineProperties()

//Create the car object
//Note: writable,enumerable,configurable true by default for the
//defined props
var car = {
  name: 'Escort RS2000',
  make: 'Ford'
}

// Define some properties on the car object
Object.defineProperties(car, {
  show: {
    value: function() {
      return this.make+' '+this.name+' '+this.capacity+'cc'+' '+this.sound;
    }
  },
  sound: { 
    value: 'Beep!',
    writable: true,
    enumerable: true,
    configurable: true
  },
  capacity: {
    value: 1993,
    writable: true
  }
});

console.log('1.'+car.show()); //Ford Escort RS2000 1993cc Beep!

Object.getOwnPropertyDescriptor()

This function returns only those property descriptors assigned to the object and not those in the prototype chain.

var Fruit = {
  name: 'Lemon'
}

/*
{
  value: 'Lemon',
  writable: true,
  enumerable: true,
  configurable: true
}
*/
console.log(Object.getOwnPropertyDescriptor(Fruit,'name'));

var Apple = Object.create(Fruit,{
  name: {value:'Apple'}
});

/*
{
  value: 'Apple',
  writable: false,
  enumerable: false,
  configurable: false
}
*/
console.log(Object.getOwnPropertyDescriptor(Apple,'name'));

Object.getOwnPropertyNames()

This function is similar to getOwnPropertyDescriptor except it returns the properties owned directly by the object.

// Create a Fruit object
var Fruit = {
  name: 'Lemon',
  citrus:true
}

console.log(Object.getOwnPropertyNames(Fruit)); // [ 'name', 'citrus' ]

// Create an apple object
var Apple = Object.create(Fruit,{
  name: {value:'Apple'}
});

console.log(Object.getOwnPropertyNames(Apple));// [ 'name' ]


Here again we have a Fruit object but this time it has two properties, name and citrus. Calling getOwnPropertyNames as expected returns these two properties. Next we have an Apple class that defines its own name property. Calling getOwnPropertyNames will only return the name property and not those from the linked Fruit object. Note that name property is returned even though it is non-enumerable by default.

Object.keys()

Returns an array of the objects own property names. If the property descriptor is set as non enumerable then it will not be returned. If the object is an array then the list of indices will be returned.

// Create an array
var arr = ['a','b','c'];
console.log(Object.keys(arr));// [ '0', '1', '2' ]

// Create a Fruit object
var Fruit = {
  name: 'Lemon',
  citrus:true
}
console.log(Object.keys(Fruit));// [ 'name', 'citrus' ]

// Create an apple object, which can be changed
var Apple = Object.create(Fruit,{
  name: {value:'Apple',configurable:true}
});

console.log(Object.keys(Apple));// []

Object.defineProperty(Apple, 'name', {
  enumerable:true
});

// Now the 'name' property is visible
console.log(Object.keys(Apple));// [ 'name' ]

Object.preventExtensions()

This function locks down the object, stopping new properties from being added. Existing properties can be updated though if the correct descriptors are set.

// Create a Fruit object
var Fruit = {
  name: 'Lemon',
  citrus:true
}

// Create an apple object
var Apple = Object.create(Fruit,{
  name: {value:'Apple',configurable:true}
});
Object.preventExtensions(Apple);

// An existing property can be updated
Object.defineProperty(Apple, 'name', {
  value:'Golden delicious'
});
console.log(Apple.name);// Golden delicious

// A new property cannot be added
// TypeError: Cannot define property colour, object is not extensible
Object.defineProperty(Apple, 'colour', {
  value:'Green'
});

Object.isExtensible()

This function goes hand in hand with preventExtensions. Determines whether new properties can be added.

var Lemon = {
  name: 'Lemon',
  citrus:true
}

console.log(Object.isExtensible(Lemon)); //true
Object.preventExtensions(Lemon);
console.log(Object.isExtensible(Lemon)); //false

Object.seal()

This function will prevent new properties being added as well as stopping existing properties being removed or updated i.e. configurable is set to false.

// Create using Object.create(). Remember all descriptors
// will be set to false when creating an object this way
// writable = false
var Lemon = Object.create({
  name: { 
   value: 'Lemon'
  }
});
Object.seal(Lemon);

// Try updating the name
// TypeError: Cannot define property name, object is not extensible
Object.defineProperty(Lemon, 'name', {
  value:'Lemon McLemonface'
});
// Objects created this way have their descriptor set to true by default
// writable = true
var Lime = {
  name: 'Lime',
}
Object.seal(Lime);
Object.defineProperty(Lime, 'name', {
  value:'Lime McLimeface'
});
console.log(Lime);// { name: 'Lime McLimeface' }

Object.isSealed()

Checks if the object is sealed. No code example necessary here as it is pretty self explanatory.

Object.freeze()

Freeze is pretty hardcore. Doing this means the object cannot be modified in any way. This means adding/updating properties, changing property descriptors or changing the object’s prototype. Under the hood calling freeze explicitly sets the configurable and writable descriptors to false. This can be seen in the example below.

var CitrusFruit = {
  citrus: true
}
var Lime = {
  name: 'Lime'
}

Object.setPrototypeOf(Lime, CitrusFruit);
//name is writable:true,enumerable:true,configurable:true
Object.freeze(Lime);
//name is writable:false,enumerable:true,configurable:false

Object.setPrototypeOf(Lime, {});//TypeError: [object Object] is not extensible

Object.isFrozen()

Checks if the object is frozen. No code example necessary here as it is pretty self explanatory.

bind()

The bind function passes the this context to the given function.

const car = {
  name: 'Escort',
  getName: function() {
    return this.name;
  }
}

console.log(car.getName()); //Escort
const notBoundFn = car.getName;
console.log(notBoundFn()); //undefined

// bind to the correct context
const boundFn = car.getName.bind(car);
console.log(boundFn()); //Escort

Array.isArray()

Does what it says on the tin. Is the given object an array?

Array.prototype.every()

Determine if all elements in an array pass a given test

var cars = [
  {
    name:'Escort',
    colour:'Blue',
  },
  {
    name:'Panda',
    colour:'Blue',
  },
  {
    name:'Golf',
    colour:'Blue',
  }
];

var result = cars.every(function(car){
  return car.colour === 'Blue';
});
console.log(result); //true

Array.prototype.filter()

Return a new array constructed using the condition set in the filter function.

var cars = [
  {
    name:'Escort',
    price:2000,
  },
  {
    name:'Panda',
    price:200,
  },
  {
    name:'Lada',
    price:100,
  }
];

var cheapCars = cars.filter(function(car){
  return car.price < 500;
});
console.log(cheapCars); //[{name: 'Panda', price: 200}, {name: 'Lada', price: 100}]

Array.prototype.forEach()

Loop through each element in an array. Note break and continue are not allowed in a forEach loop.

var cars = [
  {
    name:'Escort',
    price:2000,
  },
  {
    name:'Panda',
    price:200,
  },
  {
    name:'Lada',
    price:100,
  }
];
var names = [];

cars.forEach(function(car){
  names.push(car.name);
});

console.log(names); //[ 'Escort', 'Panda', 'Lada' ]

Array.prototype.indexOf()

Return the index of the given object. -1 will be returned in the object is not found. The second argument set the starting index for the search to begin. The default is zero.

var index;
var escort = {
    name:'Escort',
    price:2000,
};
var panda =   {
    name:'Panda',
    price:200,
  };
var lada =  {
    name:'Lada',
    price:100,
  };
var cars = [escort,panda,lada];

index = cars.indexOf(null);
console.log(index); //-1

index = cars.indexOf(escort);
console.log(index); //0

index = cars.indexOf(escort,1);
console.log(index); //-1

index = cars.indexOf(lada,2);
console.log(index); //2

Array.prototype.lastIndexOf()

Searches the array backwards from an optional starting index. Stops when the first occurrence of the object is found.

var cars = ['Panda','Escort','Escort','Lada']

var index = cars.lastIndexOf('Escort');
console.log(index); //2

var index = cars.lastIndexOf('Escort', 1);
console.log(index); //1

Array.prototype.map()

The map function is very useful. It allows you to create a new array by calling a function for every item in the array and returning the result.

Here we have an array of car objects and we want to calculate the age of each car and add it to the car object. We could use the forEach loop but a more succinct way is to use the map function.

cars = [
  {
    name:'Escort',
    date:1980
  },
  {
    name:'Ferrari',
    date:1999
  },
  {
    name:'VW Transporter',
    date:2005
  }
];

var cars2 = cars.map( function(_car) {
  let age = new Date().getFullYear() - _car.date
  return Object.create(_car,{age:{value:age}});
})
console.log(cars2[0].name); // Escort
console.log(cars2[0].date); // 1980
console.log(cars2[0].age); // 40

Array.prototype.reduce()/reduceRight()

These esoteric functions allow a list of items to be reduced down to a single value. A simple example would be to add the values of an array together.

let monthly_car_sales = [1,10,1,10,10,4,1,1,1,1,1,1];
let start = 0;
let yearly_sales = monthly_car_sales.reduce(function(_prev,_current)
{
  return _prev + _current;
},start);

console.log(yearly_sales); //42

reduceRight sone the same as reduce except the array is traversed from right to left. Simples!

Array.prototype.some()

Applies a function which should return true or false. If one or more entries return true then the result of calling some will return true. In the following example we have a list of quarterly sales figures. The business states that in order to have hit targets at least one quarter should have had sales of more than 900.

let sales = [10,500,1000,700];
let hit_target = sales.some(function(_sales){
  return _sales > 900;
});
console.log(hit_target); //true

Date.now()

Returns the number of milliseconds since January 1st, 1970.

Date.prototype.toISOString()

Returns the date as a string that conforms to ISO standard 8601.

var dt = new Date('2020-01-01 09:00').toISOString()
console.log(dt); //2020-01-01T09:00:00.000Z

JSON.parse()

Parse and JSON string and return a valid JSON object. An optional argument can be used to change the returned result. If doing this based on a test be sure to return the original value otherwise the property will be deleted from the JSON object.

var jsonStr = 'badjson';
JSON.parse(jsonStr); //SyntaxError: Unexpected token b in JSON at position 0

// Adjust all strings to be upper case
jsonStr = JSON.parse('{"good":"json"}',function(key,value){
  if ( typeof value==='string')
    return value.toUpperCase();
  return value; // Remember to return this
}); //{ good: 'JSON' }

JSON.stringify()

Convert a JSON object into a string. An optional replace can to be used to change the output. You can add a function which works in the same way as the function in the parse function or use an array which will whitelist what is returned.

var json = {userId:'123-456',name:'Joe Satriani'};
var str = JSON.stringify(json,null,2); // indent by 2 spaces
/*
{
  "userId": -333,
  "name": "Joe Satriani"
}
*/
console.log(str);

// Do not show the name
str = JSON.stringify(json,function(key,value) {
  if ( key === 'name') {
    return value.replace(/[a-zA-Z0-9]/g, '*');
  }    
  return value;
});
console.log(str); //{"userId":-333,"name":"*** ********"}

//Only show the name
str = JSON.stringify(json,['name']);
console.log(str); //{"name":"Joe Satriani"}

Boolean, Number, String and Date `toJSON()` functions

‘set’ and ‘get’ keywords

Next we have property setter and getters. These handy constructs allow you to pretend that a function is a simple property. Note that when using the set keyword the function must have one, and only one, property.

Here we have created a car object with two static properties, name and make. Then we have defined a setter property called makeAndName which returns the two properties concatenated together. The setter property takes a single parameter, the value of which is then split and then assigned to the make and name props.

var car = {
    name: 'Escort RS2000',
    make: 'Ford',
    get makeAndName() {
        return this.make +' '+ this.name;
    },
    set makeAndName(value) {
        let makeAndName = value.split(' ');
        this.make = makeAndName[0];
        this.name = makeAndName[1];
    }
}

console.log(car.makeAndName); //Ford Escort RS2000
car.makeAndName = 'Citroen Picasso';
console.log(car.makeAndName); //Citroen Picasso

It is also possible to define a setter/getter when using the defineProperty function.
Hoist away

What is hoisting and why should you care?

Hoisting means you can do this

x = 5;
var x;
console.log(x) //5

plus5(5);

function plus5(a) {
  console.log(a+" plus 5 is "+(a+5)); //5 plus 5 is 10
}

Hmm, looks okay doesn’t it? Hang on, the variable x is being initialized before it is declared. Yes, that is because the interpreter has placed the declaration to the top of the file for you. You don’t see this happening it is just magic. The same goes for functions as well. Here the function plus5 is called before it is defined. Spooky.

Only declarations using ‘var’ are hoisted

var a = 5; //Initialize a
var result;
c=2; // Initialization causes declaration, no hoisting

//Display a and b and c, b at this point is undefined because it 
//is initialized on the next line
result = a+" "+b+" "+c; 
var b = 7; // Initialize b

console.log(result); // 5 undefined 2

In the example above b is undefined when result is initialized. This is because only the declaration is hoisted and not the assignment. This is the same as writing

var a,b; //Declare a and b
a=5; //Initialize a
var result; //Declare result
result=a+" "+b; //Display a and b,b is undefined at this point

b = 7; //Initialize b
console.log(result); //5 undefined

This behaviour can lead to unexpected behaviour in your code.

‘let’ and ‘const’ keywords are not hoisted

If you use these ES6 keywords then you do not need to be concerned about hoisting. If it doubt then ditch var and use const or let instead.

ES6 classes the easy way

Creating classes using Javascript is a strange affair with multiple exotic constructs, which adds up to a lot of confusion especially for novice coders. Now with the advent of ES6 finally we have a way to define and create class hierachies in an understandable way. It still falls a little short though. More of that later.

If you want to experiment with any of these patterns then you can use the repl.it Javascript sandbox straight from your browser(clicking the link opens a new tab). So without further ado let’s dig in.

The old way(s)

I will go through these patterns in turn, feel free to skip but I think it’s useful to become familiar as you will most likely come across some if not all of these at some point in your coding career.

Way 1. Object or ‘dot’ notation

var car= {
    name: 'Escort RS2000',
    make: 'Ford',
    sound: 'Beep!',
    show: function() {
        return this._showDetails();
    },
    _showDetails: function() {
        return `${this.make}-${this.name} goes ${this.sound}`;
  }
}

This example uses object notation using properties. Note that a property can define a variable or a function. Remember Javascript objects are nothing more than bags of properties at the end of the day!

console.log(car.name); // Escort RS2000
console.log(car.make); // Ford
console.log(car.show()); // Ford-Escort RS2000 goes Beep!

Way 2. Constructor invocation

This is possibly the most commonly used way of creating Javascript objects. It uses a special function prototype object to define the class. Over to Mr Crockford for an explanation…

JavaScript is a prototypal inheritance language. That means that objects can inherit properties directly from other objects. The language is class-free.

This is a radical departure from the current fashion. Most languages today are classical. Prototypal inheritance is powerfully expressive, but is not widely understood. JavaScript itself is not confident in its prototypal nature, so it offers an object-making syntax that is reminiscent of the classical languages. Few classical programmers found prototypal inheritance to be acceptable, and classically inspired syntax obscures the language’s true prototypal nature. It is the worst of both worlds.

If a function is invoked with the new prefix, then a new object will be created with a hidden link to the value of the function’s prototype member, and this will be bound to that new object.

Douglas Crockford – Javascript: The Good Parts

Here is our Car class created using this pattern. Firstly the Car function is declared. Then each class function is attached to the prototype. Calling new will attach the prototype to the Car function, allowing our class members be be accessed within the show and _showDetails functions.

function Car(name, make) {
    this.name = name;
    this.make = make;
    this.sound = 'Beep!';
}
Car.prototype.show = function() {
    return this._showDetails();
};
Car.prototype._showDetails = function() {
    return `${this.make}-${this.name} goes ${this.sound}`;
};
var car = new Car('Escort RS2000', 'Ford');
console.log(car.name); //Escort RS2000
console.log(car.make); //Ford
console.log(car.show()); //Ford-Escort RS2000 goes Beep!
console.log(car instanceof Car); //true

This way has the advantage of being able to do proper type checking which is always useful. This actually how ES6 classes work under the hood using a sprinkle of magic syntactic sugar!

Way 3. Object.create

var car=Object.create({
    name:{
        value: 'Escort RS2000',
        configurable: true,
        writable: false,
        enumerable: false
    },
    make: 'Ford',
    sound: 'Beep!',
    show: function() {
        return this._showDetails();
    },
    _showDetails: function() {
        return `${this.make}-${this.name} goes ${this.sound}`;
    }
});
console.log(car.name);  //Escort RS2000
console.log(car.make);  //Ford
console.log(car.show());//Ford-Escort RS2000 goes Beep!

So why would you use this construct? Firstly, you can assign extra options called property descriptors when defining the property. This is shown in the name property above. The bigger draw is that it allows you to build class hierarchies using prototype linking.

Consider the following example.

// Declare a `Car` object
function Car(name, make) {
    this.name = name;
    this.make = make;
    this.sound = 'Beep!';
}
Car.prototype.show = function() {
    return this._showDetails();
};
Car.prototype._showDetails = function() {
    return `${this.make}-${this.name} goes ${this.sound}`;
};

// Use the `Car` object to create an `Electric` car. First we define the prototype
// function, remembering to call the `Car` constructor
function ElectricCar(name,make) {
  Car.call(this,name,make); // call super constructor.
  this.sound = 'Laser blast!'; // override the sound prop
}

// Now we use `Object.create` to extend the `Car` object by binding to its prototype
ElectricCar.prototype = Object.create(Car.prototype); 

var elec = new ElectricCar('X', 'Tesla');
console.log(elec.name); //X
console.log(elec.make); //Tesla
console.log(elec.show()); //Tesla-X goes Laser blast!

Way 4. ES6 Classes

class Car {
  constructor(_name,_make) {
      this.name = _name;
      this.make = _make;
  }
  // Getter
  // get keyword allows you to define custom properties that can
  // be accessed using dot notation
  get show() {
    return this._showDetails();
  }
  _showDetails = function() {
    return `${this.make}-${this.name} goes ${this.sound}`;
  }
  get sound() {
    return 'Beep!';
  }
}

We have created a class using the class keyword. Each class has a constructor function.

Now we can create a new Car class using the new keyword. Note the special name property which returns the name of the class.

let car = new Car('Escort RS2000', 'Ford');
console.log(car.name); //Escort RS2000
console.log(car.show); //Ford-Escort RS2000 goes Beep!
console.log(Car.name); //Car
console.log(car instanceof Car); //true

Having created the class we can easily implement inheritance using the extends keyword.

class Truck extends Car {
  constructor(_name, _make) {
    super(_name, _make);
  }
  get sound() {
    return 'HONK!';
  }
}

Remember to call the base class constructor using the super keyword. In this example the sound property has been overridden to return ‘HONK!’

let truck = new Truck('SCANIA', 'R480');
console.log(truck.show); //SCANIA-R480 goes HONK!
console.log(truck instanceof Car); true
console.log(truck instanceof Truck); true

It’s interesting to mention again that under the hood, constructor invocation is used using prototype linking. This new way of defining a class is syntactic sugar used to simplify the creation of classes. One thing is missing however, This class has a private function denoted by the underscore. But there is nothing to stop you doing this:

truck._showDetails();//SCANIA-R480 goes HONK!

There are plans afoot to add the ability to define private functions using the # prefix as mentioned here but at present it has limited browser support.


References and further reading

https://developer.mozilla.org/en-US/docs/Web/JavaScript/Inheritance_and_the_prototype_chain

https://developer.mozilla.org/en-US/docs/Web/JavaScript/Reference/Classes